Last Updated
    2 / 28 / 12
Original Site


    Path: BinaryBedlam > Krill Labs > procedures > How-To > Replacing Nintendo's 72 Pin Connector    


Replacing Nintendo's 72 Pin Connector
Developed:        
10/1/08


Status:
In Use


Summary:
Fixing Your Classic Nintendo.
-OVERVIEW-


About:
      Anyone who has ever owned a classic Nintendo knows all too much about jiggling, shaking, and blowing. After many years
of heavy use, it gets harder and harder to get those games started. Well it turns out that it's not actually the game
cartridges that are wearing out, it's the connector inside the Nintendo. Plugging the games in and out slowly wears out
this connector by pushing the contact prongs out. Eventually as more and more prongs are bent out, the game can no longer
be held snuggly in the Nintendo thus there is a poor electrical contact.


Solution:
      If your Nintendo is one of they many out there with less than a 10% game-boot rate, don't despair! Don't throw away that
precious piece of your childhood, fix it! That connector in the Nintendo is removable and replaceable. Just go online,
eBay is a good start, and buy the Nintendo 72 Pin Connector. They are between 5 and 10 dollars. Then you carefully open
your unit, locate the old connector, remove it, and pop in the new one. If done correctly, your Nintendo will work just
like you were living in the 80s again!


Photo Series:

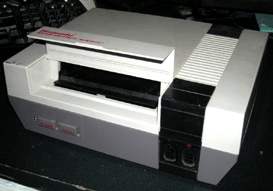
       Fully assembled and ready for surgery.


       Flip over and remove all the screws with a little arrow pointing to them.


       Remove the screws holding the metal plate in place.


       Remove the metal plate then remove the black cartridge holder by removing the tiny screws in it's tabs.


       With the cartridge holder removed, take out the screws that are holding down the connector.


       Finally, the connector can be slid off the main circuit board. This part can be really tricky as there is no room
to just slide it off, you have to carefully lift up the circuit board a little first to make room. This often means
you have to remove an extra screw or 2 to get the circuit board raised. Once off, slide the new connector on
and reassemble the unit.


Viewer Comments


Leave A Comment


NAME: REMARK:


BinaryBedlam's Basic Web Development 2010© .
Created by Dan Krill of BinaryBedlam ; Krill Labs and any of its subsidiary components, which include but are not limited to: Graphical Design and Layout, Images, and Decals;
are the property of the owner and should not be used with out expressed written consent from the web administrator .